Google Maps Android API v2 – Current Location Example with GPS

Screenshot_2014-03-15-13-40-54

Today I am going to tell you how to work with Google Maps Android v2 . In here I will show you how to view your current location in Google Maps with GPS.

First of all you have to Add Google Play Service Library to your project because Google Map for Android is now integrated with Google Play Services. So we need to set up Google Play Service Library for developing Google Map application in Android.

Please follow the given below link to setup Google Play Service library in Eclipse.

How to setup Google Play Service library in Eclipse

This is how you add Google Play Service Library to your project

Screenshot at 2014-03-20 16:28:36

Next We need to get an API key from Google to use Google Maps in Android application. Please follow the given below link to get the API key for Google Maps Android API v2.

How to get API Key

then you are done with main steps. Now lets move to the coding part.

This is my Activity file >>>>>>>>>>>>>>


package com.madushanka.mylocation;

import android.annotation.SuppressLint;
import android.app.ActionBar;
import android.location.Criteria;
import android.location.Location;
import android.location.LocationListener;
import android.location.LocationManager;
import android.os.Bundle;
import android.support.v4.app.FragmentActivity;
import android.view.Window;

import com.google.android.gms.maps.CameraUpdateFactory;
import com.google.android.gms.maps.GoogleMap;
import com.google.android.gms.maps.SupportMapFragment;
import com.google.android.gms.maps.model.LatLng;
import com.madushanka.mylocation.R;

@SuppressLint("NewApi")
public class LocationActivity extends FragmentActivity implements LocationListener{
    private GoogleMap mMap;

    @Override
    public void onCreate(Bundle savedInstanceState) {
        super.onCreate(savedInstanceState);

        if (android.os.Build.VERSION.SDK_INT < 11)
		 {
			 requestWindowFeature(Window.FEATURE_NO_TITLE);

		 }
		else{
		ActionBar actionBar = getActionBar();
		actionBar.hide();}

        setContentView(R.layout.activity_location);

        loadMap();

        LocationManager locationManager = (LocationManager) getSystemService(LOCATION_SERVICE);

        // Creating a criteria object to retrieve provider
        Criteria criteria = new Criteria();

        // Getting the name of the best provider
        String provider = locationManager.getBestProvider(criteria, true);

        // Getting Current Location
        Location location = locationManager.getLastKnownLocation(provider);

        if(location!=null){
            onLocationChanged(location);
        }
        locationManager.requestLocationUpdates(provider, 20000, 0, this);
    }

    @Override
    protected void onResume() {
        super.onResume();
        loadMap();
    }
// this is method for create and load map with Support Map Fragment

    private void loadMap() {
        if (mMap != null) {
            return;
        }
        mMap = ((SupportMapFragment) getSupportFragmentManager().findFragmentById(R.id.map)).getMap();
        if (mMap == null) {
            return;
        }
        mMap.setMapType(GoogleMap.MAP_TYPE_HYBRID);
        mMap.setMyLocationEnabled(true);

    }

	@Override
	public void onLocationChanged(Location location) {
		 double latitude = location.getLatitude();

	        // Getting longitude of the current location
	        double longitude = location.getLongitude();

	        // Creating a LatLng object for the current location
	        LatLng latLng = new LatLng(latitude, longitude);

	        mMap.moveCamera(CameraUpdateFactory.newLatLng(latLng));

	        // Zoom in, animating the camera.
	        mMap.animateCamera(CameraUpdateFactory.zoomTo(14), 2000, null);

	}

	@Override
	public void onProviderDisabled(String provider) {
		// TODO Auto-generated method stub

	}

	@Override
	public void onProviderEnabled(String provider) {
		// TODO Auto-generated method stub

	}

	@Override
	public void onStatusChanged(String provider, int status, Bundle extras) {
		// TODO Auto-generated method stub

	}
}

This is my Layout xml >>>>>>>>>>>>>>>>>>

<?xml version="1.0" encoding="utf-8"?>
<!--
See this page for more XML attribute options
https://developers.google.com/maps/documentation/android/map#using_xml_attributes
-->

<fragment xmlns:android="http://schemas.android.com/apk/res/android"
          xmlns:map="http://schemas.android.com/apk/res-auto"
          android:id="@+id/map"
          android:layout_width="match_parent"
          android:layout_height="match_parent"
          android:name="com.google.android.gms.maps.SupportMapFragment"
          map:mapType="normal"/>


Next we have to add permissions , app key and openGl feature to app manifest.
This is my Android Manifest File >>>>>>>>>>>>>>>


<?xml version="1.0" encoding="utf-8"?>
<manifest xmlns:android="http://schemas.android.com/apk/res/android"
    package="com.madushanka.mylocation"
    android:versionCode="1"
    android:versionName="1.0" >

    <uses-sdk
        android:minSdkVersion="10"
        android:targetSdkVersion="18" />
    
    <permission
        android:name="com.maduzz.madushanka.permission.MAPS_RECEIVE"
        android:protectionLevel="signature"/>
 
    <uses-permission android:name="com.madushanka.mylocation.permission.MAPS_RECEIVE"/>
    <uses-permission android:name="android.permission.INTERNET"/>
    <uses-permission android:name="android.permission.WRITE_EXTERNAL_STORAGE"/>
    <uses-permission android:name="com.google.android.providers.gsf.permission.READ_GSERVICES"/>
    <uses-permission android:name="android.permission.ACCESS_COARSE_LOCATION"/>
    <uses-permission android:name="android.permission.ACCESS_FINE_LOCATION"/>
 
    <uses-feature
        android:glEsVersion="0x00020000"
        android:required="true"/>

    <application
        android:allowBackup="true"
        android:icon="@drawable/ic_launcher"
        android:label="@string/app_name"
        android:theme="@style/AppTheme" >
        <activity
            android:name="com.madushanka.mylocation.MainActivity"
            android:label="@string/app_name" >
            <intent-filter>
                <action android:name="android.intent.action.MAIN" />

                <category android:name="android.intent.category.LAUNCHER" />
            </intent-filter>
        </activity>
        <activity
            android:name="com.madushanka.mylocation.LocationActivity"
            android:label="@string/title_activity_location" >
        </activity>
        
         <meta-data
            android:name="com.google.android.maps.v2.API_KEY"
             android:value="Your API Key Here"/>
        
    </application>

</manifest>


Now we almost finish. Next you have to enable GPS in the device from Settings.

This is a very simple example of Google Maps Android but you can get start from this example if it is helpful do not forget to make comments.

You can download and tryout this application from Google Play Store

Download My Location

Android SQLite Database Example

Today I’m going to tell you how to developed Android database application with SQLite .
In above video you can see the working example.

Now we look into details of this example app. In here I have two main layouts first one is to

  1. Create Database & Table
  2. Add Data to a table
  3. Drop Database

This is my activity_main,xml its a main layout of my sample app

Screenshot at 2013-05-14 20:26:42


<RelativeLayout xmlns:android="http://schemas.android.com/apk/res/android"
    xmlns:tools="http://schemas.android.com/tools"
    android:layout_width="fill_parent"
    android:layout_height="fill_parent"
    tools:context=".MainActivity"
    android:background="@drawable/b" >

    <AbsoluteLayout
        android:layout_width="wrap_content"
        android:layout_height="wrap_content"
        android:layout_alignParentBottom="true"
        android:layout_alignParentLeft="true"
        android:layout_alignParentRight="true"
        android:layout_alignParentTop="true" >

    <Button
        android:id="@+id/button1"
        android:layout_width="wrap_content"
        android:layout_height="wrap_content"
        android:layout_x="12dp"
        android:layout_y="10dp"
        android:onClick="createDB"
        android:text="CreateDB and Table" />

    <TextView
        android:id="@+id/textView1"
        android:layout_width="wrap_content"
        android:layout_height="wrap_content"
        android:layout_x="17dp"
        android:layout_y="100dp"
        android:text="Name"
        android:textColor="@android:color/white"
        android:textAppearance="?android:attr/textAppearanceMedium" />

    <EditText
        android:id="@+id/editText1"
        android:layout_width="275dp"
        android:layout_height="wrap_content"
        android:layout_x="13dp"
        android:layout_y="129dp"
        android:ems="10" />

    <TextView
        android:id="@+id/textView2"
        android:layout_width="wrap_content"
        android:layout_height="wrap_content"
        android:layout_x="18dp"
        android:layout_y="187dp"
        android:text="Age"
        android:textColor="@android:color/white"
        android:textAppearance="?android:attr/textAppearanceMedium" />

    <Button
        android:id="@+id/button4"
        android:layout_width="142dp"
        android:layout_height="wrap_content"
        android:layout_x="167dp"
        android:layout_y="10dp"
        android:onClick="drop"
        android:text="DropDB" />

    <Button
        android:id="@+id/button3"
        android:layout_width="266dp"
        android:layout_height="wrap_content"
        android:layout_x="26dp"
        android:layout_y="357dp"
        android:onClick="viewData"
        android:text="View Data" />

    <EditText
        android:id="@+id/editText2"
        android:layout_width="148dp"
        android:layout_height="wrap_content"
        android:layout_x="15dp"
        android:layout_y="215dp"
        android:ems="10"
        android:inputType="number" />


    <Button
        android:id="@+id/button2"
        android:layout_width="wrap_content"
        android:layout_height="wrap_content"
        android:layout_x="188dp"
        android:layout_y="214dp"
        android:onClick="addData"
        android:text="Save Data" />

    </AbsoluteLayout>

</RelativeLayout>

This is my MainActivity class which is related to above layout.


package com.madushanka.dbtest;

import android.os.Bundle;
import android.app.Activity;
import android.content.Intent;
import android.database.sqlite.SQLiteDatabase;
import android.util.Log;
import android.view.View;
import android.widget.EditText;
import android.widget.Toast;

public class MainActivity extends Activity {

	SQLiteDatabase myDB = null;
	String TableName = "Student";
	String Data = "";
	EditText studentName;
	EditText studentAge;

	@Override
	protected void onCreate(Bundle savedInstanceState) {
		
		super.onCreate(savedInstanceState);
		
		setContentView(R.layout.activity_main);
		
		studentName = (EditText) findViewById(R.id.editText1); // getting text fields (Edit Text)
		
		studentAge= (EditText) findViewById(R.id.editText2);

	}
	
	// this method will trigger when user clicked " CreateDB & Table " button 

	public void createDB(View v) { 

		try {
			// Get the database if database is not exists create new database 
			// Database name is " test " 
			
			myDB = this.openOrCreateDatabase("test", MODE_PRIVATE, null);
			
			// Create table with tow columns (Name and Age)
		
			myDB.execSQL("CREATE TABLE IF NOT EXISTS " + TableName
					+ " (Name VARCHAR, Age INT(3));");

			Toast.makeText(getBaseContext(), "Database & Table Created",Toast.LENGTH_LONG).show();
			
		} catch (Exception e) {

			Log.e("Error", "Error", e);

			Toast.makeText(getBaseContext(),
					"Error in creating atabase or Table", Toast.LENGTH_LONG).show();

		}

	}
	
	// this method will trigger when user clicked " Drop DB " button 

	public void drop(View v) {

		try {
			// we use deleteDatabse("Database name ") method to delete database 
			// we have to pass String parameter to give the name of database
			
			deleteDatabase("test"); 

			Toast.makeText(getBaseContext(), "Databse Deleted", Toast.LENGTH_LONG)
					.show();
		} catch (Exception e) {

			Log.e("Error", "Error", e);

			Toast.makeText(getBaseContext(), "Error in deleting",Toast.LENGTH_LONG).show();

		}

	}

	// this method will trigger when user clicked " Save Data " button 

	
	public void addData(View v) {
		
		try{
			
			// getting created database or if database is not exists create new database
			
		myDB = this.openOrCreateDatabase("test", MODE_PRIVATE, null);


		String name =studentName.getText().toString();
		int age = Integer.parseInt(studentAge.getText().toString().trim());

		myDB.execSQL("INSERT INTO " + TableName + " (Name, Age)" + " VALUES ('"
				+ name + "', " + age + ");");

		Toast.makeText(getBaseContext(), "Date Saved ", Toast.LENGTH_LONG).show();
		}
		
		catch(Exception e){
			
			Log.e("Error", "Error", e);
			
			Toast.makeText(getBaseContext(), "No Database found   ", Toast.LENGTH_LONG).show();
			
		}
	}

	// this method will trigger when user clicked " View Data " button 

	public void viewData(View v) {
		
		// creating new intent using ViewActivity Class and start activity to show table data

		Intent i = new Intent(this,ViewActivity.class);
		startActivity(i);

	}

}


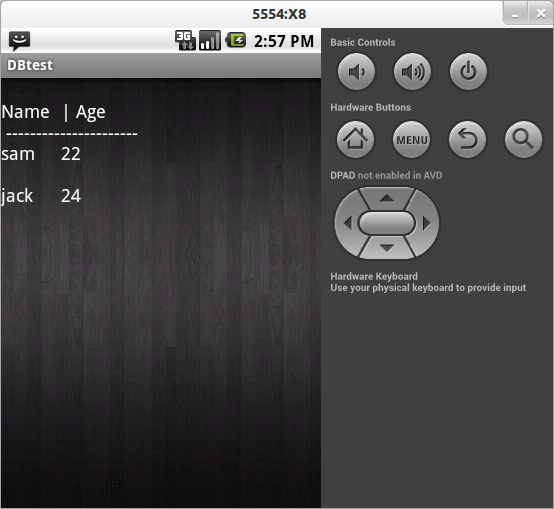
Second Layout is activity_view.xml using this layout I will dispaly the table content (table recodes)

Screenshot at 2013-05-14 20:27:46


<RelativeLayout xmlns:android="http://schemas.android.com/apk/res/android"
    xmlns:tools="http://schemas.android.com/tools"
    android:layout_width="fill_parent"
    android:layout_height="fill_parent"
    tools:context=".ViewActivity"
    android:background="@drawable/b" >

    <TextView
        android:layout_width="wrap_content"
        android:layout_height="wrap_content"
        android:layout_centerHorizontal="true"
        android:layout_centerVertical="true"
        android:text="No Data Found" 
        android:textSize="18dp"
        android:textColor="@android:color/white"/>

</RelativeLayout>

This is my View Activity Class which is related to above layout


package com.madushanka.dbtest;

import android.os.Bundle;
import android.app.Activity;
import android.database.Cursor;
import android.database.sqlite.SQLiteDatabase;
import android.graphics.Color;
import android.util.Log;
import android.widget.TextView;
import android.widget.Toast;

public class ViewActivity extends Activity {
	
	SQLiteDatabase myDB = null;
	String TableName = "Student";
	String Data = "";


	@Override
	protected void onCreate(Bundle savedInstanceState) {
		super.onCreate(savedInstanceState);
		setContentView(R.layout.activity_view);
		
		try {

			myDB = this.openOrCreateDatabase("test", MODE_PRIVATE, null);
			
			//getting the cursor object 
			
			Cursor c = myDB.rawQuery("SELECT * FROM " + TableName, null);

			int Column1 = c.getColumnIndex("Name");
			int Column2 = c.getColumnIndex("Age");

			c.moveToFirst();
			
			if (c != null) {

				do {
					String Name = c.getString(Column1);
					
					int Age = c.getInt(Column2);
					
					Data = Data + Name + "\t\t" + Age + "\n\n";
					
				} while (c.moveToNext());
			}

			TextView tv = new TextView(this); // creating Text View to show data in the app
			tv.setTextColor(Color.WHITE);
			tv.setBackgroundResource(R.drawable.b);
			tv.setTextSize(18F);
			tv.setText("\n"+"Name \t| Age \n ----------------------\n"+Data);
			setContentView(tv);  // set created text view as Content View 
			
		}

		catch (Exception e) {
			
			Log.e("Error", "Error", e);
			
			Toast.makeText(getBaseContext(), "No Data found   ", Toast.LENGTH_LONG).show();
			
		} finally {
			if (myDB != null)
				myDB.close();
		}
	}


}


You can download sample apk file from here

Maduzz Call Blocker – Android Application

Now days I’m having my new year vacation. So i decide to developed android app for you.
This time I focused on developing a utility app for android users.

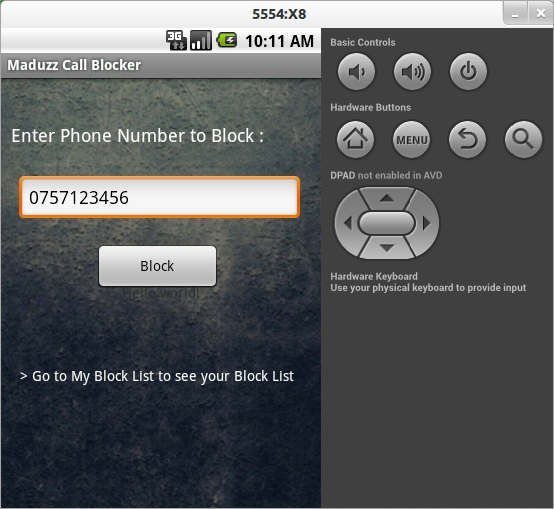
Screenshot at 2013-04-21 15:40:58

When we talking about ” Maduzz Call Blocker ” app first thing is its a light weight app and it will take low amount of your RAM .

Screenshot at 2013-04-21 15:41:34

If you want to block unwanted callers or Messages this is a best way to do it. All you have to do is add number to app’s Block List.
From that point app will deal with your unwanted callers and It will block all the calls from them.
As well as SMS messages.

Screenshot at 2013-04-21 15:42:33

When you want unblock the callers you can go to block list and select unblock thats all.

Best thing is this app is very easy to use and Its very fast.

You can download app from here >>>>>>>>>>> Download Maduzz Call Blocker.apk

Required : Android 2.1 +

Download from getjar ………….. <Download>