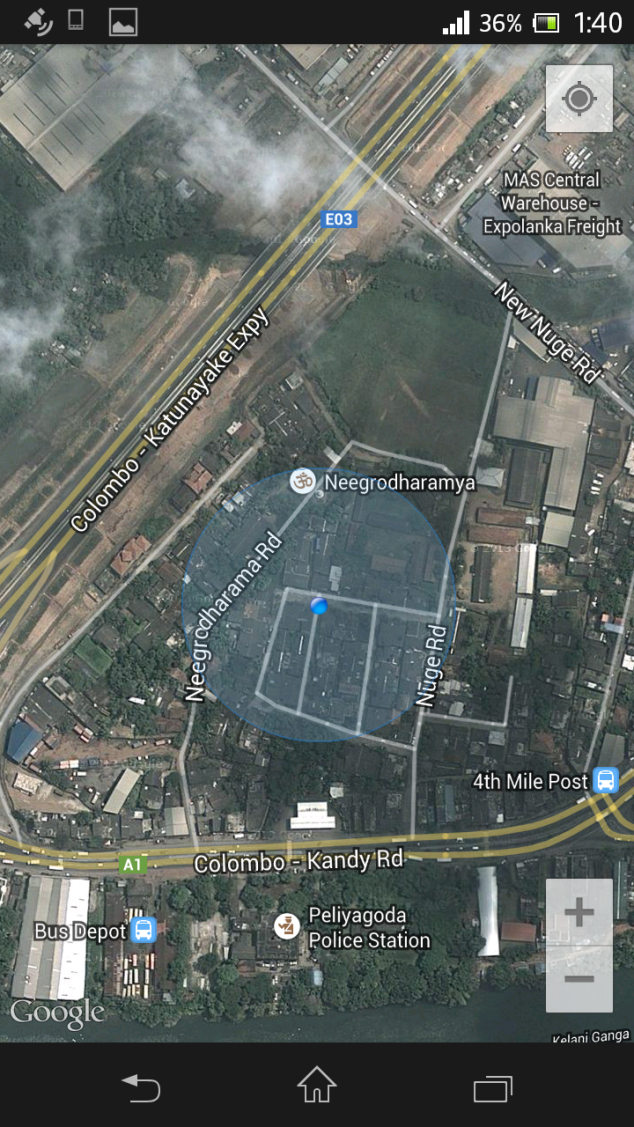
Today I am going to tell you how to work with Google Maps Android v2 . In here I will show you how to view your current location in Google Maps with GPS.
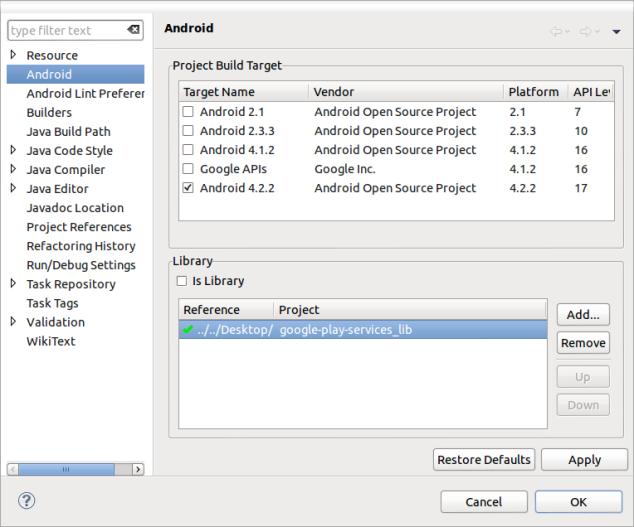
First of all you have to Add Google Play Service Library to your project because Google Map for Android is now integrated with Google Play Services. So we need to set up Google Play Service Library for developing Google Map application in Android.
Please follow the given below link to setup Google Play Service library in Eclipse.
How to setup Google Play Service library in Eclipse
This is how you add Google Play Service Library to your project
Next We need to get an API key from Google to use Google Maps in Android application. Please follow the given below link to get the API key for Google Maps Android API v2.
then you are done with main steps. Now lets move to the coding part.
This is my Activity file >>>>>>>>>>>>>>
package com.madushanka.mylocation;

import android.annotation.SuppressLint;
import android.app.ActionBar;
import android.location.Criteria;
import android.location.Location;
import android.location.LocationListener;
import android.location.LocationManager;
import android.os.Bundle;
import android.support.v4.app.FragmentActivity;
import android.view.Window;

import com.google.android.gms.maps.CameraUpdateFactory;
import com.google.android.gms.maps.GoogleMap;
import com.google.android.gms.maps.SupportMapFragment;
import com.google.android.gms.maps.model.LatLng;
import com.madushanka.mylocation.R;

@SuppressLint("NewApi")
public class LocationActivity extends FragmentActivity implements LocationListener{
    private GoogleMap mMap;

    @Override
    public void onCreate(Bundle savedInstanceState) {
        super.onCreate(savedInstanceState);

        if (android.os.Build.VERSION.SDK_INT < 11)
		 {
			 requestWindowFeature(Window.FEATURE_NO_TITLE);

		 }
		else{
		ActionBar actionBar = getActionBar();
		actionBar.hide();}

        setContentView(R.layout.activity_location);

        loadMap();

        LocationManager locationManager = (LocationManager) getSystemService(LOCATION_SERVICE);

        // Creating a criteria object to retrieve provider
        Criteria criteria = new Criteria();

        // Getting the name of the best provider
        String provider = locationManager.getBestProvider(criteria, true);

        // Getting Current Location
        Location location = locationManager.getLastKnownLocation(provider);

        if(location!=null){
            onLocationChanged(location);
        }
        locationManager.requestLocationUpdates(provider, 20000, 0, this);
    }

    @Override
    protected void onResume() {
        super.onResume();
        loadMap();
    }
// this is method for create and load map with Support Map Fragment

    private void loadMap() {
        if (mMap != null) {
            return;
        }
        mMap = ((SupportMapFragment) getSupportFragmentManager().findFragmentById(R.id.map)).getMap();
        if (mMap == null) {
            return;
        }
        mMap.setMapType(GoogleMap.MAP_TYPE_HYBRID);
        mMap.setMyLocationEnabled(true);

    }

	@Override
	public void onLocationChanged(Location location) {
		 double latitude = location.getLatitude();

	        // Getting longitude of the current location
	        double longitude = location.getLongitude();

	        // Creating a LatLng object for the current location
	        LatLng latLng = new LatLng(latitude, longitude);

	        mMap.moveCamera(CameraUpdateFactory.newLatLng(latLng));

	        // Zoom in, animating the camera.
	        mMap.animateCamera(CameraUpdateFactory.zoomTo(14), 2000, null);

	}

	@Override
	public void onProviderDisabled(String provider) {
		// TODO Auto-generated method stub

	}

	@Override
	public void onProviderEnabled(String provider) {
		// TODO Auto-generated method stub

	}

	@Override
	public void onStatusChanged(String provider, int status, Bundle extras) {
		// TODO Auto-generated method stub

	}
}
This is my Layout xml >>>>>>>>>>>>>>>>>>
<?xml version="1.0" encoding="utf-8"?>
<!--
See this page for more XML attribute options
https://developers.google.com/maps/documentation/android/map#using_xml_attributes
-->

<fragment xmlns:android="http://schemas.android.com/apk/res/android"
          xmlns:map="http://schemas.android.com/apk/res-auto"
          android:id="@+id/map"
          android:layout_width="match_parent"
          android:layout_height="match_parent"
          android:name="com.google.android.gms.maps.SupportMapFragment"
          map:mapType="normal"/>
Next we have to add permissions , app key and openGl feature to app manifest.
This is my Android Manifest File >>>>>>>>>>>>>>>
<?xml version="1.0" encoding="utf-8"?>
<manifest xmlns:android="http://schemas.android.com/apk/res/android"
    package="com.madushanka.mylocation"
    android:versionCode="1"
    android:versionName="1.0" >

    <uses-sdk
        android:minSdkVersion="10"
        android:targetSdkVersion="18" />

    <permission
        android:name="com.maduzz.madushanka.permission.MAPS_RECEIVE"
        android:protectionLevel="signature"/>

    <uses-permission android:name="com.madushanka.mylocation.permission.MAPS_RECEIVE"/>
    <uses-permission android:name="android.permission.INTERNET"/>
    <uses-permission android:name="android.permission.WRITE_EXTERNAL_STORAGE"/>
    <uses-permission android:name="com.google.android.providers.gsf.permission.READ_GSERVICES"/>
    <uses-permission android:name="android.permission.ACCESS_COARSE_LOCATION"/>
    <uses-permission android:name="android.permission.ACCESS_FINE_LOCATION"/>

    <uses-feature
        android:glEsVersion="0x00020000"
        android:required="true"/>

    <application
        android:allowBackup="true"
        android:icon="@drawable/ic_launcher"
        android:label="@string/app_name"
        android:theme="@style/AppTheme" >
        <activity
            android:name="com.madushanka.mylocation.MainActivity"
            android:label="@string/app_name" >
            <intent-filter>
                <action android:name="android.intent.action.MAIN" />

                <category android:name="android.intent.category.LAUNCHER" />
            </intent-filter>
        </activity>
        <activity
            android:name="com.madushanka.mylocation.LocationActivity"
            android:label="@string/title_activity_location" >
        </activity>

         <meta-data
            android:name="com.google.android.maps.v2.API_KEY"
             android:value="Your API Key Here"/>

    </application>

</manifest>
Now we almost finish. Next you have to enable GPS in the device from Settings.
This is a very simple example of Google Maps Android but you can get start from this example if it is helpful do not forget to make comments.
You can download and tryout this application from Google Play Store


